
Selection of land for seed production
The selection of land is the first and foremost task for a seed producer. The seed production plot must be selected carefully. A fertile and healthy seed plot will certainly produce quality seed. The field selected for seed production must not have been sown with field bean in the previous season. This is done to avoid volunteer plants that cause admixture. Fields continuously cultivated with field lab lab may harbour wilt pathogen. Hence, such fields must be avoided where ever possible. Following crop rotation will help to reduce endemic pathogen.
Soil with neutral pH must be selected. Loam or clay loam soils are best suited. Higher organic matter will lead to production of vigorous seed.
☺ What are volunteers? Volunteers are plants that grow in the field from the seeds found in the soil. These seeds should have been fallen from previous season crop. As they germinate without sowing or they volunteer to grow by themselves, hence the name volunteer plants. |
|
Isolating the seed crop to avoid genetic contamination
The quality seed must be genetically and physically pure. Genetic purity can be maintained by preventing cross pollination with other undesirable varieties. This is achieved by isolating the seed crop. Isolation is the act of growing the seed crop away from a contaminant such that cross pollination is prevented. Field lab lab is a self pollinated crop. The field lab lab seed crop must be grown 5 m away from another variety of field lab lab.
Selecting the right season
Seed is very sensitive to weather. A grain crop can be sold for a lower price even if it damaged by rain. But a seed crop, if affected will lead to reduced seed vigor. Hence selecting the right season is necessary. Generally, the seed should mature in cool dry climate. Seasons are selected with this Idea in mind.
In Tamil Nadu the best seed crop growing March - April and September - October as the seeds then mature during the cool months of January - February.
Preparation of land
The land is thrown in ridges and furrows of one and half feet wide or ~eds and channels of 4' x 6' depending on cultivation practices.
Fertilizer application
Ten cartloads (5T) of well decomposed compost is spread along with basal application of 25kg urea and 125kg super phosphate per acre.
Selection of seeds
Seeds used for sowing must be from an authentic source. An authentic source is one that proves the genetic purity and other aspects of seed quality of seep' being sown. Seeds used for sowing must also be vigorous only then we can expect a good field stand. Seeds must be checked for hard seeds, diseased seeds, immature seeds, shrunken and deformed seeds.
It must be noted that any farmer can take up certified seed production. The Agricultural Officer of the area will be of help. The certified seed crop will be taken using Foundation seed and Foundation seed crop using Breeder seeds.
Seed rate
Depending on the variety the seed rate varies from 8kg to 10kg per acre.
Seed treatment using Rhizobium
Two packets of Rhizobium will be needed to treat seeds of an acre. In order to make the rhizobium stick to the seeds, we need a binder. The binder is prepared using rice gruel. This is prepared by adding 100 gm of rice to 500 ml of water and boiled until the rice becomes sticky.
Three hundred milliliters of rice gruel is needed for preparing the rhizobial inoculation. The prepared rice gruel is then cooled under shade for 5 hrs. To this cooled rice gruel, two packets of rhizobium are added and stirred into a black sticky mass. The eight kilos of blackgram seeds are placed in bucket. The rice gruel-rhizobial mixture is then poured over the seed and seeds are mixed well using a stick or hand. After assuring that the blackgram seeds are coated evenly by rhizobial inoculum, the seeds are spread over gunny and dried under shade for 6 hrs. The dried seeds are then used for sowing within 24 hrs of inoculation.
☺Attention: It must be noted that any farmer can take up certified seed production. The Agricultural Officer of that area will be 0 help. The certified seed crop will be taken using Foundation seed and Foundation seed crop using Breeder seeds. |
|
Sowing
The seeds are sown at 2cm depth with a plant - to - plant spacing of 15cm and 45cm between rows.
Irrigation management
Seed crop is very sensitive to irrigation. Seed fields must be constantly monitored for drought conditions. If not irrigated properly, pulse crop shed flowers. Water starved plants produce seeds that are hard and small with low vigor. Hence, pulse seed crop needs regular and sufficient irrigation.
Water is applied immediately after sowing followed by life irrigation on the third day. Then, irrigation is carried out whenever, the fields become dry. Irrigation during flowering, pod formation and seed development are must.
Foliar feeding of fertilizers
Basal application of fertilizers alone is not sufficient for the seed crop. It is necessary that we provide nutrition during the heavy growth and seed formation period when there is a huge demand for nutrients.
The nutrient needed by the fast developing pulse seeds are provided through foliar feeding. This provides rapid food source like sick humans are provided glucose fluid through intravenous method. We have to prepare a DAP nutrient solution for spraying. This done by soaking 4kg of DAP fertilizer in 20 Litres of water overnight. The next day morning, the solution is filtered through a cloth. One litre of filterate is then added to the sprayer tank followed by adding 9 Litres of water to fill the tank. The solution is then sprayed during the early morning or evening to avoid scorching. The crop must be irrigated immediately after spraying. This nutrient solution is sprayed 45 days after sowing followed by another spray 55 days.
☻Caution:
1. Always buy freshly prepared packets.
2. Seed treatment using fungicides must be done 24 hrs earlier to rhizobium seed treatment.
3. Do not use the rhizobium packet if the content is dried. |
Weed control
Immediately after sowing and irrigation, Basalin weedicide is sprayed by dissolving 2ml of Basalin per litre of water. The spraying of weedicide must be done within three days of sowing. If done later, it can harm the seed crop. Application of weedicide will control the early growing weeds, in order to control later emerging weeds, manual weeding done after 15days will be useful. Some times, the 600ml of Basalin can be mixed with 20kg sand (4 iron chatties of sand) and evenly spread on the field within three days of sowing. This reduces the cost of spraying.
Pest and disease control
Pests
During the early stages, aphids may infect the crop and can be controlled by spraying Dimethoate or Phasphomidan 2ml/ litre of water. The major pest is heliothis which makes holes in young pods and eats the seeds. The worms can be collected and killed or sprayed with Metasystox, Dimethoate or Phasphomidan at the rate of 2ml per litre.
Diseases
During the growing phases of the seed crap incidence of wilt can be seen. The affected plants turn brown and die. These plants can be rogued out as and when they appear. The affected area is sprayed using 0.1 % Bavistin solution. Yellow mosaic can also be seen as the affected leaves turn yellow. Such plants are pulled out and destroyed followed by a spray of quinalphos 3ml/L to ward of white fly. Powdery mildew is noticed by the presence of white powder deposits on the leaves. The powdery mildew can be controlled by spraying Dithane M 45 @ 4g / litre. Antharcnose disease which appears as round spots on leaves can be controlled by spraying Mancozeb 1 % solution.
Maintaining seed quality by through rouging
One of the most important aspects of seed production is thorough rouging. Rogue is defined presence of those plants that deviates from the characters described for the variety. Such rouges if left in the field they tend to reduce the genetic purity of the seed crop and thus reduce purchase value of resultant seed. Roguing is defined as the operation of removing rouges. In practice, all plants that do not obey the characteristics of the particular seed crop are to be removed along with diseased plants, other crop plants, weeds, insect affected plants during rouging operation.
☺ Precautions during spraying:
1. Irrigate the crop immediately after spraying or ensure that adequate soil moisture is available.
2. Spraying should be done during evening hours.
3. Drench well the crop with spray solution.
4. DAP solution can be combined with pesticides.
5. Avoid spraying during peak flowering.
|
When to do rouging
Rouging is more effective if done prior to flowering, since upon flowering there is very high possibility of cross pollination. Rouging is also attempted during flowering, pod formation stage and prior to harvest in case of pulse crop.
Rouging during vegetative phase
During vegetative phase i.e. during first 25 days, rouging is attempted based on plant characters like height of plant, leaf shape, size, venation, surface of leaf and presence or absence of hairs on plant surface. Plants showing wilt are also removed.
Rouging during flowering phase
The rouges are identified based on flower characteristics. During this phase when most of the plants are flowering, all those plants still in vegetative phase are also removed.
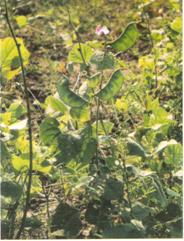
View of field lab lab crop
(Purple flowered variety)
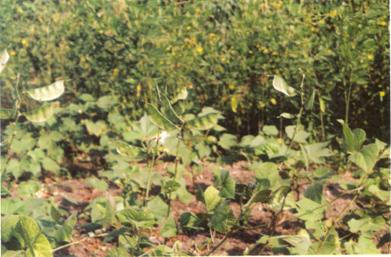
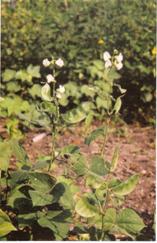
Field lab lab (White flowered variety)
Rouging during pod formation phase
At this phase, the rouges are removed based on pod characteristics like length of pod, width, size, shape and colour are the major characteristics for roguing.
Field lab lab pod
Rouging during pod harvest phase
Rouging is done prior to harvest based on seed characteristics like colour of seed, lustre and size of seed.
☻ Caution!
All the rouges must be immediately removed from the seed field and destroyed. |
Proper care during harvest
The seed crop comes to harvest 140 days for Co 1 and 90 days for Co 2 after sowing. At this time, 70% the pods turn straw coloured. Prior to harvest there is an important pest to be controlled. Bruchids are the major pests of stored pulse seeds.
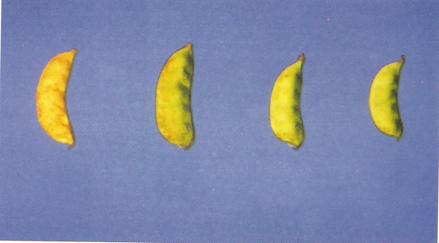
Stages of maturing pods
Pre -harvest sanitation spray
Bruchids lay eggs on the surface, the grubs bore into the seeds and eat the cotyledon. The seeds thus store poorly and loose viability faster. It has been found that bruchids lay "their eggs on the pods while in the field itself. Hence control of these pests must start from the field it self. The field carry-over of Bruchids can be controlled if the crop is sprayed using Quinalphos 0.07% (2 ml of insecticide per litre) ten days prior to harvest.
Upon ripening, the pods will turn from green to straw coloured. This is the right stage for harvest for seed purpose. Delaying will lead to infection by diseases, pests and sometimes seed vigor will be lost due to untimely rains. The first five harvests are alone used for seed extraction. During harvest, the shrunken, damaged and immature pods if any are removed.
If the plants come to even harvest, ripe pods are picked and then spread out to dry. The pods will dry and become brown and may start splitting. The pods are then beaten using pliable sticks to prevent damage to seeds. After thorough beating, the seeds are separated from pods. The plant debris are removed and seeds cleaned by winnowing.
Cleaned seeds are then dried on tarpaulin on the threshing floor until the moisture content is reduced to 10%. This is the safe moisture content for storing seeds and maintaining their viability.
Processing to improve seed quality
One of the main characteristics of seed quality is the right size. Plumpy seeds are better than ill-filled puny seeds. Grading is one simple method by which we can separate the filled seeds from broken and puny seeds. Grading is done using round holed sieves. Such sieves are easily available in the market. The sieve size for lab lab is 7.00 mm'. After sieving, those seeds that are broken, fungal infected, seed coat damaged seeds are removed.
Protecting seeds during storage
Seeds after harvest have to be stored so that they are viable and healthy for sowing during the ensuing season. Hence, proper after care during storage is very essential part of seed production.
Seed moisture content
Seed moisture is the most important physical quality. Seed moisture determines the length of seed storage life. Higher the moisture, the longevity of seed is reduced drastically. Seeds with moisture are attacked by fungal and other storage pests like Bruchids. Further, seeds being living organisms tend to utilize all their stored energy and loose vigor. Hence, reducing seed moisture is the first step in ensuring longer seed life.
The moisture content must be reduced to 9% for short term storage of 6-8 months. Seeds with 9% moisture can be stored in cloth bag or gunny. Seeds that have to be stored for long term i.e. 1-2 yrs, have to be dried to 7% moisture. Such seeds have to be stored in polythene bag.
☺ Point to remember:
Seeds stored in polythene bag have to be dried to moisture content below 7%. This is necessary because polythene bag do not allow moisture to move out and seeds if stored with high moisture will get damaged. Hence always store are seeds with low moisture in polythene bags. |
Seed treatment
Seeds are generally affected by fungi during storage. To prevent, seeds are treated with fungicide before storage. Lab lab seeds are treated using Bavistin at the rate of 4g/kg of seeds.
Seed packing
After seed treatment, seeds have to be stored in bags or containers. Choosing the right type of container is necessary. This depends on the quantity of seeds to be stored and storage environment. Seeds absorb moisture and even if the seed is dried to safe moisture content before storage, during storage depending upon the prevailing climatic conditions, seeds tend to absorb moisture. If the storage is attempted in an environment with high humidity, seed absorb moisture until they equilibrate with the atmosphere. Hence high humidity in the environment will lead to increase in seed moisture that is detrimental to seed storage. Such high humid conditions exist at sea shores, near lakes and rivers. Most of the places of peninsular India are highly humid especially during the monsoon periods between the months of June-December.
In case of short term storage, cloth bag can be preferred. Cloth bag is porous and hence it can hold seeds for short period. However, cloth bags are cheaper and easily made using local tailor. Large quantity of seeds can stored in gunny bag. If the seeds are to be stored for longer period that thick polythene bags can be used.
Stacking seed bags
Seed bags can be stacked one upon other upto 6 layers. Stacking beyond this will damage the seeds present in the lower layers. To prevent damage to seeds in the bottom layers, the layers can be rotated periodically by shifting the lower layers to the top and vice -versa. Stacking must also be done on dunnages. Dunnages are wooden rafts that keep the seeds above floor and allow aeration. Tarpaulins and thick plastic sheet can also be used.
Taking care of seeds during storage
Seed treatment is most effective in combating fungal pathogens.
Grain cum seed storage
Pulses are used both as seed and grain. Pulse seeds have high demand as grain also. Farmers may be tempted to use them for grain as the market price for grain sometimes exceeds the seed cost. Under such circumstances the seeds can treated with harmless substances like activated clay, neem oil and vegetable oil.
What is activated clay?
Activated clay is ordinary white clay moisture removed and acid washed to improve its ability to damage insect surface. It is very cheap and non-toxic to humans. Seeds treated with activated clay can be washed and reused for consumption.
Activated clay is used to treat seeds at the rate of 100g per kg of seeds. Activated clay has rough clay particles that cut the surface of bruchids. Such bruchid beetles then die as they loose moisture fast compared to unbruised ones.
Similarly pulse seeds can also treated using vegetable oils/neem oil @ 3 m1 per kg. These techniques are eco- friendly techniques which do not harm the environment also.
☺ Red earth seed pelleting:
Seeds can be pelleted using a paste of red earth. Finely pow¬dered red earth is made into paste using water and seeds are pelleted using the paste. This is an eco-friendly seed treat¬ment. Seeds must be dried once in three - four months to 8 % moisture for safe storage. |
Seed certification
Seed certification guarantees the quality of seed as it ensures that the certified seed has the genetic, physical, physiological and seed health qualities. Genetic purity means that the seed gives rise to a plant which conforms to the varietal characteristics of the variety. The physical purity means that the seed is free from stones, broken seeds, straw bits and leaf bits etc. Physiological quality is measured by germination and seed health envisages freedom from pest and diseases.
Seed certification is being done in many stages. It starts from verifying whether seeds were obtained from authenticated source, verification of isolation distance and inspection during plant growth, flowering, harvesting, processing and bagging. Also seed samples are drawn form the seed lot and sent to seed testing lab to test whether the seeds are possessing required physical purity and germination. Then certification tag is issued. Colour of the tag is blue for certified seeds.
Only those seeds harvested from fields having prescribed field standards and possessing required seed standards are certified by the Certification Agency. Seeds thus certified are offered for sales. For further details nearer seed certification office may be contacted.
Minimum seed certification standards prescribed for certified seed
Field standards |
|
Rogues ( maximum limit) |
0.2% |
Seed standards |
|
Pure seeds (minimum limit) |
98.0% |
Inert matter (maximum limit) |
2.0% |
Other crop seeds (maximum limit) |
1.0% |
Weed seeds (maximum limit) |
1.0% |
Germination (minimum limit) |
75.0% |
Moisture content |
|
Moisture proof bag |
7.0% |
Moisture pervious bag |
9.0% |
